|
|
|
|
|
|
|
|
|
|
|
|
|
|
|
|
|
|
|
|
|
|
|
|
|
|
|
|
|
|
|
|
|
|
|
|
 |
|
|
|
|
|
|
 |
|
|
|
|
|
|
|
|
|
|
|
|
| Or..... adding a rear antisway bar to your |
| 1984-87 Pontiac Fiero for Next to Nothing |
|
|
|
|
|
|
|
|
|
|
|
|
|
| Difficulty: On a scale of 1 to 10, about a 4 (easy to moderate) |
| Special Tools Needed: None |
| Time Required: About three hours if you have all the parts |
| Project Outcome: Improved handling and stability - less body roll. |
|
|
|
|
|
|
|
|
|
|
|
| The 1984-87 Pontiac Fiero's used a front suspension designed around the parameters of the Chevrolet Chevette. The rear suspension was actually a modified unit from GM's X-Car - a front wheel drive cradle and suspension assembly moved to the rear for use in the Fiero. Regrettably this rear suspension did not include an antisway bar until the entire suspension was redesigned in 1988. |
|
| Experience has shown us that the addition of an aftermarket rear anti-sway bar improves cornering, braking and overall handling significantly. |
|
| These aftermarket bars typically cost between $125 and $250, depending on the manufacturer and supplier. They mount so the bow of the bar faces the front of the car, with an indentation where it crosses the exhaust pipe to provide clearance. Most of the aftermarket bars are 7/8" in diameter and are supplied with rubber bushings. Some come with the more desirable urethane bushings and even grease fittings. Ideally, the front bar should be upgraded from 7/8" to 1" when adding the rear aftermarket bar. |
|
|
|
|
|
|
|
|
|
|
|
|
 |
|
|
|
|
|
|
|
|
|
| For those on a budget or short of available cash, there is a less expensive route that gives very acceptable improvements in handling. Simply put a surplus or salvaged FRONT anti-sway bar from a Fiero on the rear. These units are generally available in wrecking yards for around $25. You might get one free from someone who has upgraded their front bar, or just upgrade your front bar to 1" and move the old one to the back. |
|
| The installation process is really very simple. The bar is mounted so the bow in the bar is to the back of the cradle. This is exactly opposite of the aftermarket bar. We do this because the recycled front bar is narrower and has no offset for the exhaust. We can reuse the original rubber mounting bushings and brackets, but it is best to upgrade to new polyurethane bushings and brackets. A kit containing two new poly bushings and brackets is about $10 from J.C. Whitney, or most auto supply stores like Advance or AutoZone. |
|
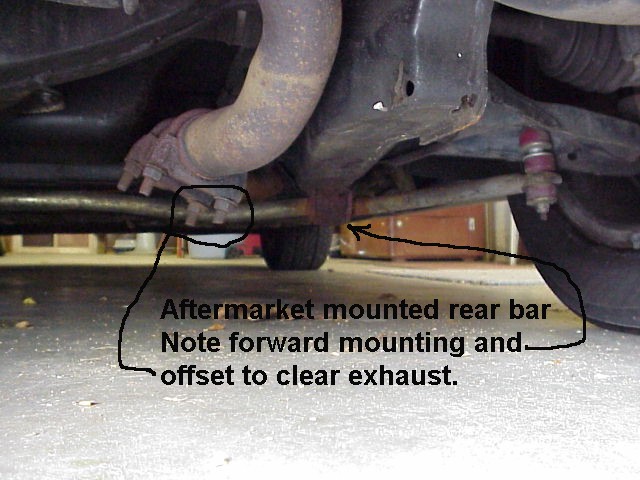
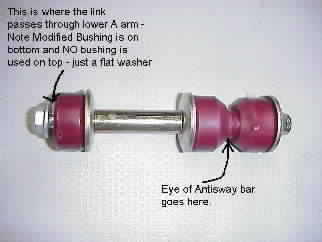
| An aftermarket bar is shown in the first photo below. Note that the bar mounts toward the front of the cradle and the links fit in existing holes in the lower "A" arm. Also note the offset to clear the exhaust pipe. |
|
|
|
|
|
|
|
|
|
|
|
|
|
|
|
 |
|
|
|
|
|
|
|
|
|
|
|
|
 |
|
|
|
|
|
|
|
|
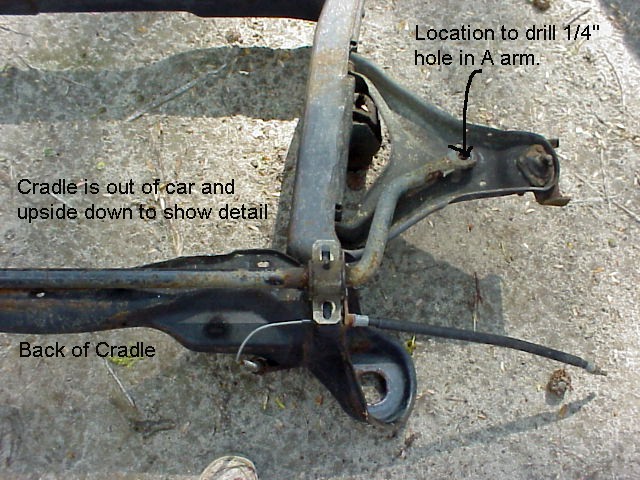
| The photo above shows a Fiero cradle removed from a car. Just so you understand what you are looking at, this cradle is upside down. The bottom of the cradle is facing you in the photo. A Fiero front antisway bar has been laid on the underside of the cradle in the correct mounting position. The bar pictured here is actually an aftermarket 1" bar typically used to upgrade the original front bar. Note where the "eye" of the bar hits the lower A arm. We will be drilling a hole here later on. You do not have to remove your cradle to do this modification, it can all be done "on the car". You just have to work from underneath the car. Jack the car up and place solid concrete blocks or 4x6 timbers under the tires. We want the car elevated, but we also want the rear suspension to be in it's normal loaded position. Just jacking the car up will allow the suspension to droop. Remove the jack(s) once the wheels are resting on the blocks. |
|
| In the photo below you can see the detail for the bar bracket mounts. The trick here is to position the end bracket hole so that it just barely clears the emergency brake cable where it enters the cradle. Mark this spot and drill a 5/16" hole. We are using a 5/16" bolt here so we will have more clearance around the brake cable. Otherwise, we would use a 3/8" bolt. Use a grade 5 or harder 5/16" bolt, washer and nut to attach the bracket to the cradle. There are openings on the side of the cradle that will give you access to the nut. Do the same for the front bracket bolts. You can use 3/8" bolts here if you like - or stick with the smaller 5/16". |
|
|
|
|
|
|
|
|
|
|
|
|
|
|
|
|
 |
|
|
|
|
|
|
|
|
|
|
|
| Your bar is now mounted to the cradle and your car's tires are still resting on blocks. Swing the bar up toward the lower A arm so that there is about 3" between the eye on the bar and the lower A arm. Use a pencil or scribe to mark a spot on the lower A arm straight above the eyes on the bar. |
|
| Place a block of wood on the TOP of the A arm to protect the CV boot from possible damage and drill a 1/4" hole at the point you marked. |
|
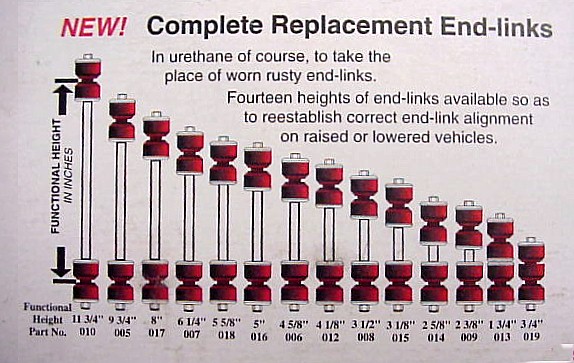
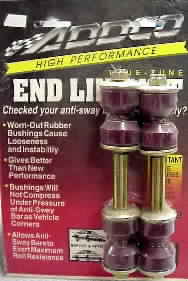
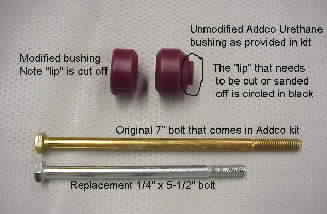
| You now need to prepare your end links. You will be using NEW links, not recycling your old ones. Addco makes a variety of replacement end links with poly bushings. Advance Auto, AutoZone and J.C. Whitney are possible suppliers. The kit is less than $10. The links are available in many different lengths. You want to buy 3-1/2" links. |
|
|
|
|
|
|
|
|
|
|
|
|
|
|
|
|
|
 |
|
|
|
|
|
|
|
|
|
 |
|
|
|
|
|
|
|
|
|
 |
|
|
|
|
|
|
|
|
|
|
|
|
|
|
| The new links need to be modified to work properly. The problem is the top of the bolt for the link is directly under the CV boot. We do not want to accidentally damage the CV boot with the bolt head. So, we remove and discard the top urethane bushing - replacing it with a 1/4" flat washer. This necessitates using a shorter link bolt. The correct length of the replacement bolt is 1/4" diameter by 5-1/2" long. The lower bushing that contacts the A arm is also modified by cutting or sanding off the "lip" and a few mm of the taper. We want this bushing to press flat against the bottom of the A arm. The rest is installed as shown. |
|
|
|
|
|
|
|
|
|
|
|
|
|
|
|
|
|
|
|
 |
|
|
|
|
|
|
|
|
|
|
|
|
|
|
|
|
 |
|
|
|
|
|
|
|
|
|
|
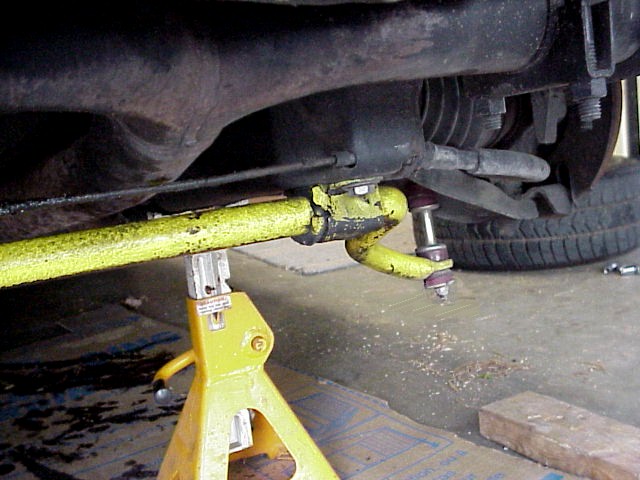
| The photo below shows the bar mounted on the rear of an 86 Fiero. |
|
|
|
|
|
|
|
|
|
|
|
|
|
 |
|
|
|
|
|
|
|
|
|
|
| Once the bar is mounted, take a little extra time to reacquaint yourself with the handling characteristics of your Fiero. In a hard turn, the rear will stick much better and there will be less body roll. But, this will also make the front wheels want to "plow" in a very hard and fast turn (you turn the front wheels, but the car does not want to turn). |
|
| Also note that while the car is less prone to understeer (back coming out) in a turn, that the back will still slip. You have little warning as to when this will happen since there is not as much body roll ahead of time to warn you. |
|
| Most folks want to lift the gas and put on the brakes when the back slips out. That is absolutely the worst thing you can do in a Fiero. This condition calls for more throttle and NO brakes. Practicing in a vacant parking lot or at a supervised SCCA scantioned Autocross is, of course, the safest way to learn where the outer limits of your car's handling occur. |
|
|
| Copyright 2000 by Randy T. Agee. Please, ask for permission to reprint or copy this article. Links to this Web site are welcome. |
|
|
|
|
|
|
|
|
|
|
|
|
|
|
|
|
|
|
|
|
|
|
|